
Welcome to Knight – The Vision
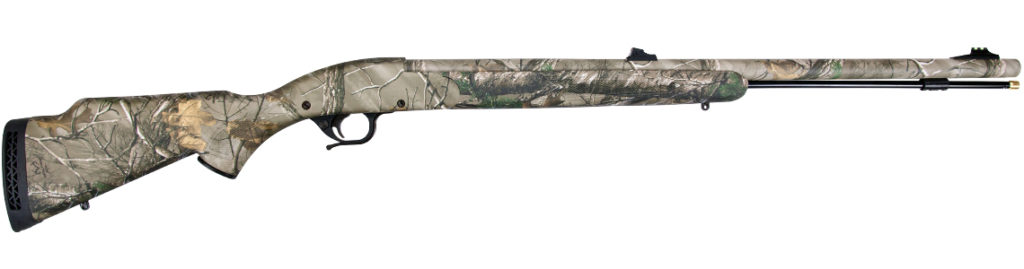
The Vision Break Action Muzzleloader is a great .50 cal. rifle with no casted components and an unbelievably smooth fully machined trigger, the quality you always get when you buy a Knight. Your shots are guaranteed at 200 yards with the Vision. The handcrafted, American-made, Green Mountain® barrel ensures every shot is powerful, fast, and accurate. The Vision also comes Western ready for legal use in Washington, Oregon and Idaho and is 100% American made.
Action: Right Handed Quick Detachable Trigger Carriage Assembly, Removable Stainless Steel Breech Plug.
Ballistics/Recommended Loads: see page 13
Barrel: Full Plastic Jacket™, 209 Primer, Bare Primer conversion M900046
Included In Package: Hex Head Combo Tool, Plug Screws, Breech Plug Jag and Extension, and Owners Manual.
Length and Weight: 44 inches, 7.9 pounds
Loading: General
Powder: Black Powder, and industry approved black powder substitutes.
(Maximum Powder Charge) 150 grains by Volume, in loose FFg or the pelleted powder FFg.
Recommended Scope Mounts: Weaver Ring/Base Sets, #M900775, #M900776, and One Piece Base and Rings #M900777.
Sights: Fully Adjustable Metallic Red Fiber Optic Rear Sight and a one piece Green Fiber Optic Bead and base. Receiver drilled and tapped for easy scope mounting.
Stock: Forestock – G1 Next, All Purpose Green, RealTree Hardwoods Green HD, Mossy Oak Break-Up Rearstock – G1 Next, All Purpose Green, Camo 1 piece overmolded stock and receiver.
Warranty: Limited Lifetime with extended service policy.

Safety System
The Vision has only one safety system, a cross-bolt safety system. To lock the trigger, push the safety to the right. Push the safety to the left, to put the rifle in the fire position.
Disassembly and Assembly
Be sure rifle is not loaded or primed before disassembly or assembly.
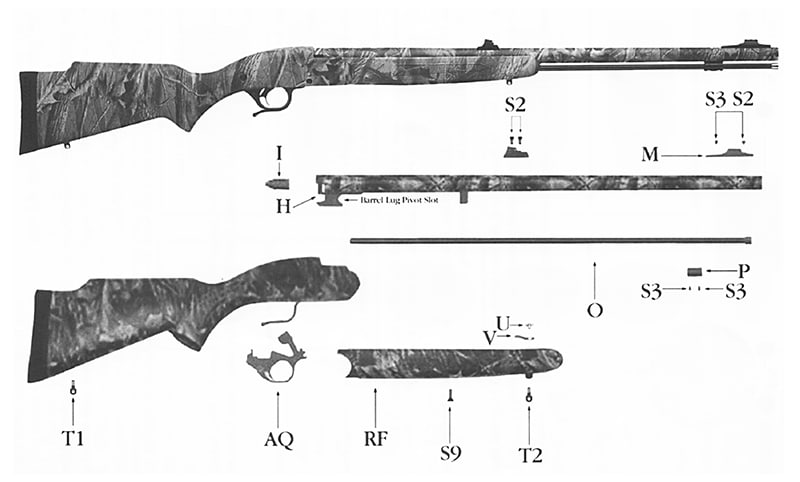
Study the rifle schematic and aquaint yourself with the different parts and terminology of your muzzleloader before assembling or disassembling. Letters and numbers in parentheses refer to labels on each rifle schematic for each model.
It is advisable to use a padded vise to remove and reinstall the breech plug. Place small parts in a pan to avoid losing them.
Disassemble
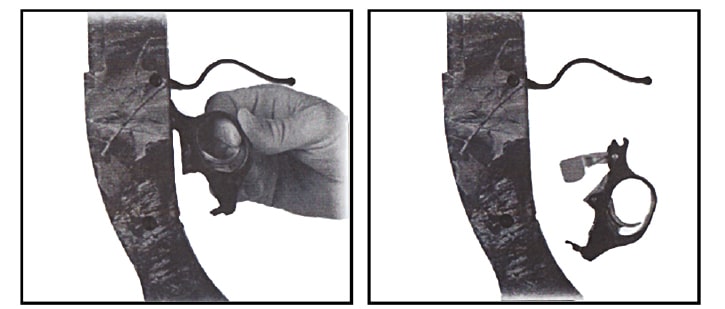
1.) Remove the trigger assembly. Remove the mechanism locking screw (Photo #1 – Letter A, see next page) found just above the trigger safety. Pull the trigger down and out of the receiver; the break-open release lever (Photo #1 – Letter B) will open the trigger to be taken out easily.
2.) Remove the breech plug. Pull the break open latch to open the rifle and expose the breech plug. With your finger, pull the extractor toward you, it will fold down and out of the way of the plug opening. Insert the combo tool (breech plug wrench side) into the receiver, engage the plug (part 1) and turn it counterclockwise until it slides out of the receiver. If more force is required, a hole in the combo tool allows for the use of a rod for added leverage. Put the plug in a jar of Knight Solvent for a few minutes while cleaning the barrel.
3.) Remove the forearm stock. By using the screwdriver end of the combo tool, take out the stock screw located on the underside of the stock. The stock and barrel easily separate.
4.) Remove the barrel. With the forestock off, the barrel will pivot off the receiver. Pull the barrel up and out to release it from the receiver.
Assembly
1.) Install the breech plug. Fill the threads of the plug with Knight Breech Plug Grease to help prevent the breech plug sticking in the receiver. Using the breech plug end of the combo, insert the breech plug into the rear of the receiver and hand tighten the plug into the receiver, until it is firmly against the back of the barrel. Be sure the breech plug is screwed all the way into the receiver. Do not over tighten the plug or it will become difficult to remove.
2.) Install the trigger assembly. Align the trigger pivot (Photo #2 – Letter C) with the receiver cross bolt. Rotate the trigger assembly back up into the receiver until snug. Replace the mechanism locking screw securing the trigger assembly into the receiver.
3.) Attach the barrel and stock. Align the barrel lug’s pivot slot with the receiver cross bolt and rotate the barrel upward until locked in place. Put the forestock up against the bottom of the barrel and slide it down onto the receiver. Using the screwdriver end of your combo tool, firmly reattach the stock screw through the forestock into the stock lug on the barrel.
209 Conversion Non-Full Plastic Jacket Breech Plugs
The Knight Vision can be converted to use 209 primers without the DISC Full Plastic Jacket.
1.) Remove the old breech plug from the rifle, and extractor.
2.) Generously grease the new breech plug with breech plug grease.
3.) Insert the new breech plug utilizing the existing combo tool.
Have Questions?
If you have questions, please email us at sales@knightrifles.com.